Serratura a combinazione

|
Difficoltà: |

|
|
Tempo: |
 
|
|
Costo: |
 
|
|
Serratura a combinazione |
|
||||||
|
|
|||||||
|
|||||||


|
10/07/2004 |
|
|
La
serratura a combinazione altro non è che un circuito capace di
riconoscere una sequenza di numeri; se la sequenza è corretta, si
ottiene un'azione; se la sequenza è errata... non succede niente. Il
circuito necessario per realizzare una serratura a combinazione con
sequenza di 3 numeri è illustrato qui di seguito. The combination lock is based on a circuit that can recognise a sequence of number. If it is the right sequence, you’ll have an action, nothing in the other case. The circuit that allows a 3 digit sequence is indicated in the drawing. |
|
22 |
|
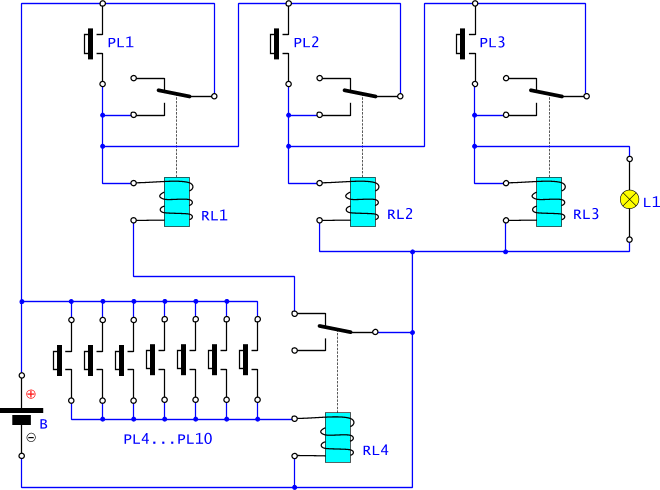
Serratura a combinazione di 3 tasti 3 digit combination lock |
|
Il circuito seguente permette la realizzazione di una serratura a combinazione di 3 tasti. I tasti devono essere pigiati nell'ordine corretto; la combinazione è costituita da PL1, PL2 e PL3 nell'ordine.
Un qualsiasi errore nella sequenza dei tasti azzera anche quelli precedenti. Il funzionamento è il seguente: PL1 manda in stick RL1 ed apre la via a PL2. Se a questo punto pigiamo PL2, anche RL2 va in stick ed apre la via a PL3. Pigiando adesso PL3, RL3 va in stick alimentando la lampadina L1 (che rappresenta il comando che volevamo fare). Se durante la sequenza sbagliamo pulsante e pigiamo uno tra PL4...PL10, alimentiamo RL4 e tagliamo l'alimentazione a RL1 facendo così cadere anche tutti gli altri relè che fossero eccitati in quel momento. The combination is obtained with the three button PL1 PL2 and PL3, pressed in this order. Any error in the sequence cancel the effects of previous buttons too. The sequence is: PL1 bring RL1 in stick and wait for PL2 that,if pressed, bring RL2 in stick. When PL3 is pressed, RL3 in stick will supply the lamp L1 (and that is the command we want). If a wrong button PL4...PL10 was pressed, we will supply RL4 and also cut the RL1 supply and also all other relay. |
|
|
|
Tabella
collegamenti / Connection table |
|
Esercizio: disegna lo schema di una serratura a combinazione di 4 tasti. Se non ci riesci puoi vedere il circuito 23. Exercise: Draw the circuit for a 4 digit combination lock. If you are not able, see the circuit 23 |
|
23 |
|
Serratura a combinazione di 4 tasti 4 digit combination lock |
|
Il circuito seguente permette la realizzazione di una serratura a combinazione di 4 tasti. Se si è compreso lo schema della serratura a 3 tasti, diventa facile comprendere lo schema seguente.
If you have understood the 3 digit circuit, it’s easy to build this circuit. |
|
|
|
|
|
Lo schema precedente funziona perfettamente ma ha un inconveniente; ogni pulsante ha bisogno di due contatti rendendo il collegamento tra circuito e pulsantiera un po' complicato. E' possibile allora "complicare" il circuito ed utilizzare come pulsantiera dei contatti che hanno un polo comune a tutti. Ciò permette, tra l'altro, anche di agevolare la costruzione della pulsantiera. This circuit works very well, but it show a disadvantage: each button needs two contacts, so the connection between circuit and keyboard will result more complex. If then you want make a circuit more interesting, you can use as keyboard some contacts having a common pole. In this case also the construction will be easier. |
|
24 |
|
Serratura a combinazione di 3 tasti con pulsantiera semplice 3 digit combination lock with simple keyboard |
|
Il circuito seguente realizza la stessa funzionalità del circuito 22 ma permette di utilizzare una pulsantiera semplificata e cioè nella quale esiste un contatto comune a tutti i pulsanti. Pigiando PL1, RL1 va in stick; per poter collegare un estremo di PL2 all'alimentazione e vincolarlo nel contempo all'eccitazione di RL1, dobbiamo utilizzare un altro contatto di RL1; PL2 quindi potrà eccitare e mandare in stick RL2 solo se RL1 è in stick. Il resto del circuito funziona in modo analogo. Utilizziamo questo schema in associazione alla pulsantiera la cui costruzione viene spiegata in seguito.
This circuit gives the same functions of the circuit 22 using a simpler keyboard, with a common contact to all buttons. Pressing PL1, then RL1 goes in stick; to connect a PL2 terminal to the supplier and, at the same time, binding it to the excitation of RL1, we have to use another terminal of RL1. PL2 will excite PL2 sending it in stick, only if RL1 is in stick. The remaining part of the circuit functions in the same way. This circuit will use the keyboard that you can build following the instructions you find here. |
|
|
|
|
Per realizzare la pulsantiera puoi stampare
l'immagine accanto o scaricare il
file Inglese |
|
Il metodo di realizzazione è del tutto analogo a quello utilizzato per costruire le basette per esperimenti. Le dimensioni esterne sono di 15x18 cm.
The construction is similar to the breadboard. External dimensions are 15x18cm. |
|
|
P+ è realizzato con una vite M3x25, P1, P2, P3 e P4 sono delle viti M3x30 alle quali sono state asportate le teste mediante taglio. PCOM è una barra filettata M3. Tutti questi contatti sono tenuti in posizione con i corrispondenti dadi. Per i "pulsanti" io ho utilizzato delle viti da valigeria con testa tonda e dorate ma il motivo è solo estetico; vanno bene delle M3x12 o M3x15. Per "pigiare" un pulsante, devi collegare un coccodrillo al terminale P+ e toccare con l'altro terminale sul numero scelto.
I made P+ using a screw M2x25, then I obtained P1, P2, P3 and P4 from screw M3x30, having cut their heads. PCOM is a screwed bar. All those contacts are fixed by nuts.
To have a nice “buttons” I used for them some screws for suitcase, brassed and with spherical head (also M3x12 or M3x15 will be suitable).
One of the crocodiles will be connected to P+
Then, to “press” a button, you have to touch with the other crocodile the number you want. |
|
|
25 |
|
Serratura a combinazione di 4 tasti con pulsantiera semplice 4 digit combination lock with simple keyboard |
|
Il circuito seguente realizza la stessa funzionalità del circuito 24 ma permette di utilizzare una combinazione di 4 tasti.
This circuit gives the same functions that the n°24, but with a 4 digit combination. |
|
|
|
26 |
|
Serratura a combinazione di 4 tasti migliorata Enhanced 4 digit combination lock |
|
Il circuito 25 ha un inconveniente: i tasti che compongono la combinazione, se vengono premuti nel momento sbagliato, non provocano nulla; per rendere la combinazione ancora più inespugnabile si può modificare il circuito in modo che i tasti che fanno parte della combinazione, se vengono premuti in modo intempestivo, agiscono come i tasti sbagliati e cioè alimentano RL5 facendo cadere tutti i relè eventualmente in stick. Se hai capito gli schemi precedenti, non faticherai a renderti conto del funzionamento del circuito seguente. Using the previous circuit (number 25) it happen that, if you digit the combination in the wrong instant, it will give no answer. We can enhance this circuit such to obtain that, in this case, the result will be the same as if we digited wrong buttons: RL5 will be fed and all relays that are in stick loss their excitation. Having studied the former circuits, you can now understand the following: |
|
|
|
|
10/07/2004 |